
| Back to Library page | ||
| - | ||
Turret Lug Tool How toHow to use the Hoffmanamps Turret lug installation tool:There are two ways to mount the tool in a press and there is manual method that requires no press. A press of some sort is the best way to go. I use the press method shown below with a cheapo drill press that has had the motor removed and now it is a full time turret lug press. The staking tools are located in my web store here |
||
| Click on the images to see a larger image | ||
 |
||
| This is what a Hoffman turret lug
board looks like if you take your time and work neatly |
||
Here's a YouTube video of me showing my new turret lug and eyelet staking tool Click on the Red YouTube logo to go to YouTube and see a much larger version This is filmed in 1440p I have more info and still pictures on my amp forum here. |
||
|
This is the press I have been using for 25 years Here's a YouTube video of me installing turret lugs Click on the Red YouTube logo to go to YouTube and see a much larger version This is filmed in 1440p |
||
| - | ||
|
Older Turret lug press video |
||
| - | ||
|
This YouTube video shows how to lace up turret lugs |
||
| - | ||
|
This YouTube video shows how to solder the laced turret lugs |
||
| - | ||
| Click on the images to see a larger image | ||
 |
 |
 |
| A few shots of my Turret lug press I mount the pointy tool to a metal plate and then bolt that plate down to the press work platform. Line up the tools so that the pointy tool meets exactly in the center of the hole tool I have a wooden support under the work platform to keep it from flexing down when pressing a lug If the work platform moves, the two tools will not be lined up correctly Bolt everything down solid so that nothing can move and mess up the alignment of the two tools I have some photos down below that show how far apart the two tools should be The reason I mount my turret lug tools this way is that you can install all the lugs in the board and swage them very quickly. If you reverse the tools, you would have to drop a lug into the hole on the lower tool and then move the board over the top of the upside down lug until you found a hole. That's very slow and time consuming to do it that way You may have noticed that I have ground down the top tool piece to a smaller diameter. I did this so that I could press lugs very close together without the tool hitting a neighboring turret lug On the Hoffman turret boards, the hole spacing is far enough apart that you do not need to grind down the tool diameter |
||
| - | ||
 |
||
| Here's a picture of the turret lug
tools that I sell The tool comes with a pointy tool and a tool with a hole that is the correct size for the turret lugs I sell It also comes with 3 nuts so you can blot it down These tools are listed on this page in my web store |
||
| - | ||
| Swaging the Turret lugs | ||
| Click on the images to see a larger image | ||
 |
||
| Drill all the holes in your board
using a 3/32 drill bit. I use plain old jobber drill bits and they work just fine. I sell drill bits and other tools on this page The drill should be run at the fast speed. Or you can buy pre drilled boards like the one shown above on my Hoffman Turret Boards page here Turret lugs and board material can also be found on the page above TIP: Make sure you are installing the lugs on the correct side of the board. Double check yourself before you start pressing |
||
| - | ||
| Click on the images to see a larger image | ||
 |
||
| Install all the lugs into the drilled
holes or do sections of the board at a time. Press them all the way down until the flange sits flush on the board surface. I use a large flat object to press them all flush at one time. Be careful not to jiggle the board so the lugs fall out. As your 3/32 drill bit wears down, the lugs may fit more snugly in the holes When the lugs get too hard to push into the holes, it's time for a new drill bit |
||
| - | ||
| Click on the images to see a larger image | ||
 |
 |
 |
| Left:
The two tools are only far apart enough to slide a lug in and
have just a bit of room on the top and the bottom of the lug Middle: push the board upward into the top tool hole Right: Pull the handle down on your press and swage out the lug It does not take very much pressure to swage or flair out the lug. They are soft brass inside with a nice plating on the outside. They are not steel The picture Below is what the backside should look like after being swaged If the swaged out backside is off center, you may have to align your tools better. If the rim is cracked, the tool may be off center or your board is not the right thickness If too much of the lug sticks out because your board is not thick enough, the rim will be cracked  Warnings: Do not tip your board over and look at the back of the board if you have not pressed all the lugs yet. Just thought I would throw that in because you know that someone is going to do it. If you are using a motorized drill press to press your lugs, do not turn the drill press on. Better yet, please unplug your drill press before you press any lugs. |
||
| - | ||
| How to use the lead bender tools | |||
 |
 |
 |
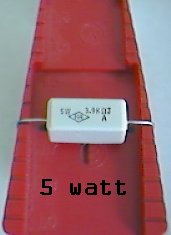 |
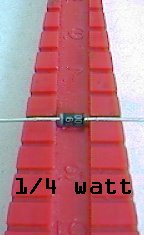
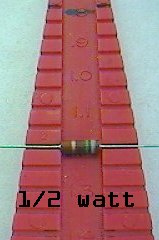
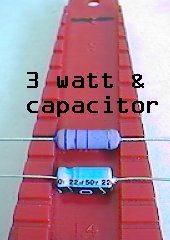
| The small lead bender handles 1/4
watt and 1/2 watt sized components. The large lead bender handles 2,3, 5 watt and larger components. Lay the component in the proper groove for the spacing that you desire. I put black lines on the spacing that I use all the time so I don't have to guess which groove is correct. I sell these tools and other tools on this page |
|||
 |
 |
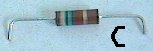 |
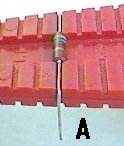
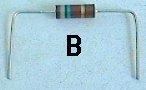
| Push straight down on the component
legs and they will bend 90 degrees. See photo A The component looks like photo B after it is bent. Trim off the excess so that you only have 1/8 inch or so. This is the part that will go down into the hole in the turret lug. See photo C If you are using an eyelet board you will need to make the legs a bit longer so they can reach down into the eyelet hole. I don't use eyelet boards so I don't have any tips on eyelet board construction |
||
| - | ||
 |
 |
 |
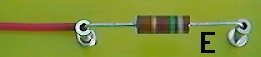
| Turret lug
parts attachment The component is suspended in mid air from the top of one lug to the top of another lug. See photo D. Wires can be attached to the lugs by making a 3/4 loop and then crimping them onto the base of the lug. See photo D and E. Wires can also be shoved into the same hole as a component as in photo F. Solder a nice dome of solder on top of the lug to hold the component in place. Components can be changed easily with this method. See photo F. Solder the wires around the base of the lug as in photo F. Wires do not need to be moved usually and I prefer to connect my wires around the base of the lug, just like the red wire is connected in photo F. I usually connect all wires that lead to the pots like the white wire in photo F. This is because the pot wires are usually the last thing to be connected and it is hard to get down around the base of the lug and not burn other components and wires. Just a personal preference of mine. |
||
| - | ||
| Manual turret lug installation method: You can also swage the lugs without a press but it requires more than two hands. You can put the tool with the hole in a vise or whatever, but you have to find some way of supporting the board and keeping the board level because your hands will be busy holding the top tool and a small hammer. You can tap the pointy tool lightly with a hammer and flare out the lugs. It's not the best way to do it, but it works. |
|
| A customer of mine found this nifty tool at Home
depot. It is a tool that holds a hand drill and turns your hand drill into a drill press. She says that it was perfect for installing the lugs in her circuit boards. Of course you do not mount the hand drill in the tool, you just use it as a lug press. I went to Home Depot and looked at it in person and it looks like it will do the job. Home Depot's SKU number for this item is SKU 459380 and at the time I looked at it, it sold for $39.97. You can buy it on line at www.homedepot.com. Thanks for the great tip Laura. Update 2014. This item may an old model that is not being made. -Here's a link to the Wolcraft web site |
 |
| I have also seen hand drill presses like the one
shown on the right on Amazon, Ebay and while doing Google searches but
I have never seen them in person. It looks to me that you would have to do some fabrication to be able to mount the top tool in the big hole that is used to hold the hand drill securely |
 |
Enter My Tube Amp Parts Store Here
Mobile users Enter My Tube Amp Parts Store Here
The Tube amp Library of information
Click the link above for Tube amp info, Schematics, Board building information, Projects, Mods, Transformer diagrams, Photo's, Sound clips.
There are hundreds of pages of Tube amp information on my library page.
Please visit my Tube Amplifier Forum
Here's the place you can go to ask tube amplifier questions.
You will find a large community of friendly amp builders at the link above.
Check the huge library of Schematics here
Design your own custom Turret Board or Eyelet board
DIY Layout Creator file analyzer program
DIY Layout Creator file library
Sound clips and tunes of all types
How to email me
|
MEMBER OF PROJECT HONEY POT Spam Harvester Protection Network provided by Unspam |