
| Back to Library page |
Bassman Re-Issue Filter caps infoInstructions for connecting the power supply filter caps on the Bassman reissue chassis. |
 |
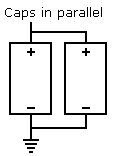
| Above are the two most common filter cap arrangements you find on Fender amps The caps are mounted on a filter cap board on the back of the chassis A metal cap can covers the cap board Left: Stage 1 is two 20uf caps in parallel making 40uf total at 500 volts working voltage Stages 2, 3 and 4 are single 20uf caps Right: Stage 1 is two 100uf caps in series with 220k balancing/bleeder resistors This arrangement makes 50uf with a 700 volt working voltage Stages 2, 3 and 4 are single 20uf caps The 1k and 4.7k / 3 watt power supply resistors are shown but these values vary on different models The Bassman re-issue is different than the diagram shown above All the filter caps are not in the cap can on the back of the chassis two stages are in the cap can and two stages are on the printed circuit board |
The original 5F6A Bassman power supply: Stage one: The old 5F6A Bassman circuit has a total of four stages of power supply filtration. There are five capacitors total, but two caps are joined together in parallel and count as one stage and this is stage one. Parallel means that the two positives are joined together and the two negatives are joined together. This gives you 40uf total capacitance at 500 volts working voltage in stage one of the power supply. Stage one is right off the rectifier tube/pin 8 and is the first stop for the power supply voltage on the circuit board. Stage two: From stage one, the power supply voltage travels through the choke. On the other side of the choke is stage two and there is another 20uf/500v cap connected to this stage. The 470 ohm screen grid resistors are connected to this stage and feed pin four of each power tube. Stage three: The power supply voltage then goes through a 4.7k power supply resistor and ends up at stage three. This is the voltage supply for the phase inverter tube and there will be a 20uf/500v cap connected to this stage also. You will see a 82k and 100k resistor connected to this stage. These two resistors head towards the phase inverter tube and supply the plates, pins 1 and 6 with voltage. Stage four: The power supply voltage then goes through a 10k power supply resistor and stops at the last stage, stage four. There will be a 20uf/500v cap connected to this stage also. Sometimes there is a smaller value on this stage but a 20uf/500v cap works great. There are three 100k plate load resistors connected here that feed the plates of the two pre-amp tubes. That is all four stages of the power supply. Look at one of my 5F6A layout diagrams on the library page to see this system presented in a simple linear fashion. |
 |
 |
 |
|
| The reissue 5F6A Bassman power supply: Stage one: Stage one and two are in the capacitor can on the back of the chassis in the Bassman reissue. This can has four caps inside but there are only two stages of power supply filtration in this can. You will see two 100uf/350v caps (stage one) that are joined together in Series, not parallel and two 47uf/350v caps (stage two) joined together in series. When you put two caps together in series, the capacitance is divided by two, and the voltage is added together. If you picture two caps stacked up like two flashlight batteries so that the positive of the bottom cap is connected to the negative of the top cap, that is series. You use the negative of the bottom cap and the positive of the top cap for the electrical connections. So we have stage one, which is two 100uf caps, divided by two = 50uf of total capacitance and a voltage rating of 350v + 350v = 700volts. Stage one has a red wired soldered to the pc board. The red wire is connected to the positive end of the top 100uf/350v cap in the series stack. The red wire then goes through a hole in the chassis and ends up inside the amp connected to stage one on the circuit board. Stage two: We also have stage two in this can which is the two 47uf/350v caps in series, divided by two = 23.5uf with a total voltage rating of 700 volts. Stage two has an orange wire soldered to the pc board. The orange wire is connected to the positive end of the top 47uf/350v cap in the series stack. The orange wire then goes through a hole in the chassis and ends up inside the amp connected to stage two on the circuit board. Both of these series arrangements for stage one and two have 220k bleeder resistors across the leads of each cap to balance the voltage and bleed down the voltage after the amp has been shut down. Leave all of this arrangement in the cap can alone, it is perfectly useable and just fine as a far as power supply filtration goes. There are a couple changes that I like to do to the wires leaving the filter cap pc board. I like to run new stranded 18 gauge wires in place of the stock red, orange and black wires that leave this board. You could use the existing red and orange wires if they will reach the lugs on the board where they need to be connected. They are a little stiff and hard to work with, but they will work. The black ground wires are not long enough to reach the power transformer grounding point and it is a good idea to run your grounds like I have explained below. New black ground wires: Unscrew the four screws holding this pc board in place and turn it upside down so you can work on it. Make sure you have drained the capacitors first by touching the red and orange wires to the black wires. If you touch all four wires together for 30 seconds, you will be safe and the caps will have bled down enough so as not to shock you. You are going to need one piece of black 18ga stranded wire that is long enough to go from the cap can pc board, through the hole in the chassis and end up over by the power transformer. This wire will be grounded on the same power transformer bolt as the other major grounds in the amp. Find the spot where the two black wires are joined to the cap can pc board and remove the two black wires. Take your piece of black 18ga stranded wire and strip enough of the end of the wire so that you can bridge across the gap and connect the wire end to both places on the pc board where the old black wires were. You can just solder the wire flush to the surface of the copper pc board traces. You may have to scrape the copper clean to get a good solder connection. You do not have to stuff the new black wire into a hole, just laying it on the copper surface and soldering it to the surface will work just fine. Ok, now you should have just one black wire that is connected to both grounds on the cap can pc board. The other end of this black wire gets a ring terminal crimped and soldered to it. It is bolted down to the chassis on the same power transformer bolt as the power cord green wire, the black wire from the end of the board kit and the red/yellow center tap wire from the power transformer. These are the major grounds of the amp and it is a good idea to put a soldered ring terminal on all the wires and use one of the power transformer bolts to make a good chassis/ground connection. Do not try to solder wires to a chassis, always crimp and solder a ring terminal and bolt down your major grounds. So basically you just replaced two separate ground wires with one big one. Stage one and two will share a common ground wire. This method has been tried and tested and makes for a very quiet amplifier, please do not try and re-invent the wheel here. While I am on the subject of grounds, do not try any of that star ground crap that some techs preach. The star grounds create more problems than they fix. This method I am describing here has been proven to produce a very quiet amplifier as far as ground hum is concerned. Now that we have our grounds for stage one and two taken care of we need to take care of the two positive wires for stage one and stage two. I replace both the red and orange wires with a new piece of stranded 18ga red wire. If you are using the old red and orange wire, you can skip this section and go to Stage three and four. New red and orange positive wires: You will be replacing the red and orange wires with two red 18ga stranded wires. You will need to figure out how long each piece of red 18ga stranded wire should be and then solder them in place of the red and orange wires. The red wire is stage one and the orange wire is stage two of the power supply filtration. The red wire is connected to the positive end of the two 100uf caps and the orange wire is connected to the positive end of the two 47uf caps. Look at the layout diagram and find the turret lugs for stage one and two and solder the wires to the correct spot. Flip the cap can pc board over and bolt it down to the chassis. Put the cover back on and screw it down. You have just finished stage one and two of the power supply filtration circuit. Stage three and four: Stage three and four filter caps are on the main pc board in the Bassman reissue. There should only be two 22uf/500v caps on that board, but there are 3 for some unknown reason. We only need two more caps for stage three and four and you can do one of two things here. You can remove two of the 22uf/500v caps from the main pc board and reuse them or you can use two new caps. I reuse two of the original caps, but the leads are kind of short. New caps are nicer because you have longer leads, but the old caps work just fine unless they are 15 years old. Get new caps if the caps are really old. The best way that I have found to mount stage three and four caps is this. Your replacement circuit board should already be installed and all the wires in the amp should be installed except the wires that lead to the pots. Install the pots and ground buss, but do not install the pot wires yet. Take the two 22uf/500v caps and make a little hook at the very end of the negative wire. This hook will hook onto the pot harness ground buss wire that runs down the back of the pots. Put the two 22uf/500v caps down inside the amp, underneath the pot harness so that they are parallel to the front pot panel and as close to the front metal panel as is possible. Make sure the caps are not near the high voltage power supply rail that runs down the front of the circuit board. The caps are sitting on the blank area of the circuit board, towards the pots side of the chassis. If you move the caps around, you will find a spot that lets you connect the positive ends to the correct lugs on the circuit board and the negative ends will be facing each other. In other words, the positive ends are far apart from each other and both caps are in a straight line like a couple flashlight batteries. Face the two negative cap ends towards each other and wrap the hook onto the pot ground buss wire. Solder the negative ends in place. I like to take a piece of the PVC coating off the red 18ga wire and slide it onto the positive ends of each 22uf/500v cap. This lets you know that the wire is hot and to keep your fingers away and keeps you from accidentally touching the positive end of the cap. Make a small hook on the positive end of each cap and solder each cap to stage three and stage four on the circuit board. You will notice that stage three and four each have several lugs that the 22uf/500v caps can be soldered to, you do not have to solder it to the lug that you see on the layout diagram. If three lugs are all connected in a row with a piece of buss wire, then any of those lugs will work. That is called a buss and you can figure out which lugs work best for the stage three and four capacitors. Stage three and four capacitors do not have very long leads and this is a good thing. The ground noise level is very low after doing the capacitors and grounds the way I have described. One last grounding tip: The ground wire coming from the preamp end of the board kit should be soldered to the pot buss wire or to a input jack ground tab. If you use an input jack for the grounding connection, make sure the jack is making good contact with the chassis. I prefer to solder this ground wire to the pot buss harness wire. Again, do not do any star grounds; you will have problems and ground noise. I have removed many star grounds on amps over the years because people were told "This is great, you must do it". There is more resistance in a piece of wire than there is in a good chassis ground. Chassis grounds have always worked well if done properly. Look how many millions of amps were built that way and work just fine. The only reason you see some Fenders having problems is because the brass ground plate under the pots corrodes and is not making good contact with the chassis. I prefer not to use the brass plates and do it like Marshall did it, solder a buss wire down the back of the pots and let all the pots make a ground connection to the chassis. The ground currents make their way through the chassis and back to the main grounding point at the power transformer. You should have four ground wires connected to ground through a bolt on the power transformer. The power cord green wire, the black wire from the power tube end of the board, the red/yellow center tap wire from the power transformer and the black wire from the filter cap can. |
Enter My Tube Amp Parts Store Here
Mobile users Enter My Tube Amp Parts Store Here
The Tube amp Library of information
Click the link above for Tube amp info, Schematics, Board building information, Projects, Mods, Transformer diagrams, Photo's, Sound clips.
There are hundreds of pages of Tube amp information on my library page.
Please visit my Tube Amplifier Forum
Here's the place you can go to ask tube amplifier questions.
You will find a large community of friendly amp builders at the link above.
Check the huge library of Schematics here
Design your own custom Turret Board or Eyelet board
DIY Layout Creator file analyzer program
DIY Layout Creator file library
Sound clips and tunes of all types
How to email me
|
MEMBER OF PROJECT HONEY POT Spam Harvester Protection Network provided by Unspam |