
Converting a Clicky switch for Off - On1 - On2 and On3 |
 |
|
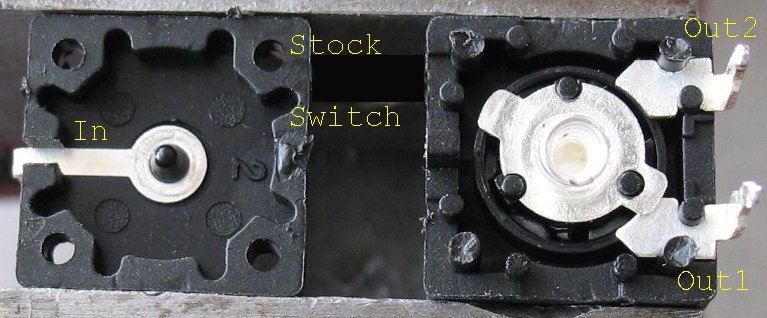
Here's a shot of a stock clicky switch. The stock switches have 3 positions = Off - On2 - On1 I am going to add one more terminal to this switch to make it Off - On2 - On1 and On3 The reason I am doing this is so I can switch two 1400ma current limiting boards on, one at a time. One board on will limit the current to 1400ma and give you a low setting on a SSC P7 LED. Two boards on at the same time will give you the high setting with 2800ma of current limiting. |
| - |
| Click on Image below for a larger Image |
 |
|
Here's shot of a stock switch. You can see Out1 and Out2 terminals. You can gently pry these switches apart and put them back together. I like to add a very small drop of super glue on each corner post after I put them back together Note on the switch above, I had already glued it together and so I had to drill out the four post to get it apart for this photo. |
| - |
| Click on Image below for a larger Image |
 |
|
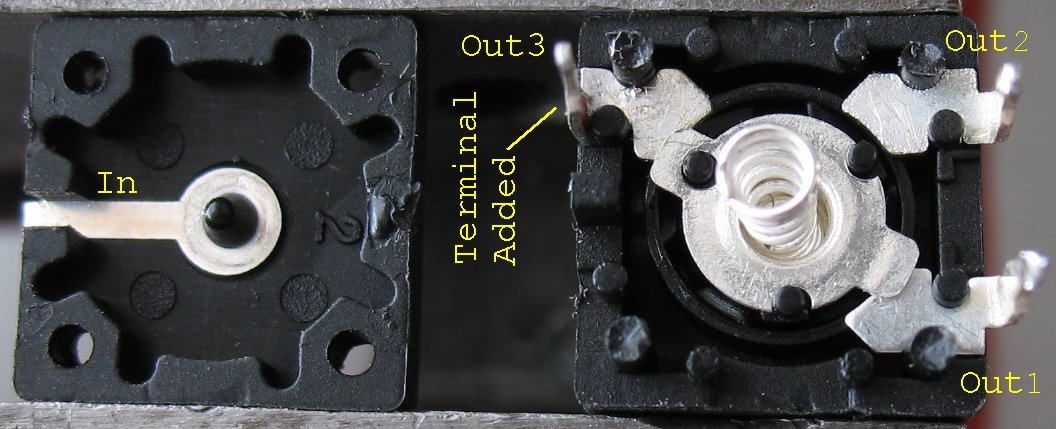
Here's a shot with a new Out3 terminal added. The switch case already has spots for 4 terminals so it was a breeze to pop in another one. If you look closely, you can see that out1 and out2 terminals are not the same. The curved part that contacts the center terminal is curved a different direction. To add an out3 terminal, take an out1 terminal from another switch See how the center terminal has two arms on it. This lets it contact two terminals at the same time. In the photo above Out1 and Out3 are on at the same time. |
| - |
|
Note that this switch actually has 6 click positions. The center terminal repeats itself twice for every revolution like this Off - On2 - On 1 and On 3 then Off - On2 - On 1 and On 3 |
Enter My Tube Amp Parts Store Here
Mobile users Enter My Tube Amp Parts Store Here
The Tube amp Library of information
Click the link above for Tube amp info, Schematics, Board building information, Projects, Mods, Transformer diagrams, Photo's, Sound clips.
There are hundreds of pages of Tube amp information on my library page.
Please visit my Tube Amplifier Forum
Here's the place you can go to ask tube amplifier questions.
You will find a large community of friendly amp builders at the link above.
Check the huge library of Schematics here
Design your own custom Turret Board or Eyelet board
DIY Layout Creator file analyzer program
DIY Layout Creator file library
Sound clips and tunes of all types
How to email me
|
MEMBER OF PROJECT HONEY POT Spam Harvester Protection Network provided by Unspam |